Category:Combat Strategy: Difference between revisions
No edit summary |
No edit summary |
||
| Line 80: | Line 80: | ||
| [[File:Trex.png|48px|link=Trex]]<br>[[Trex Mount]] | | [[File:Trex.png|48px|link=Trex]]<br>[[Trex Mount]] | ||
| [[File:Snake.png|48px|link=Snake Mount]]<br>[[Snake Mount]] | | [[File:Snake.png|48px|link=Snake Mount]]<br>[[Snake Mount]] | ||
| [[File:BlackBull.png|48px|link=Black Bull]]<br>[[Black Bull Mount]] | | [[File:BlackBull.png|48px|link=Black Bull]]<br>[[Black Bull Mount]] | ||
|} | |} | ||
=== Attack Pattern === | === Attack Pattern === | ||
<div class="kin-note"><span class="kin-note-label">Important Note:</span> You must hit/attack the boss once | <div class="kin-note"><span class="kin-note-label">Important Note:</span> You must hit/attack the boss once within 15-20 seconds else the Boss Room will consider you as "IDLE" and forced kill your character.</div> | ||
<div style="text-align:center;"> | <div style="text-align:center;"> | ||
| Line 127: | Line 127: | ||
== Mobs Strategy == | == Mobs Strategy == | ||
'' | === Wild Zombie === | ||
[[File:WildZombie.png|180px|link=Wild Zombie]] | |||
Wild Zombies are the most common hostile creatures in the [[Wilderness]] and [[Wilderness Extension]]. | |||
==== Mob Information ==== | |||
{| class="wikitable" | |||
! Name !! Wild Zombie | |||
|- | |||
| HP || 5 Bars | |||
|- | |||
| Aggro Range || 3 Tiles | |||
|- | |||
| Location || [[Wilderness]] | |||
|- | |||
| Spawn Time || 60 seconds | |||
|} | |||
==== Attack Pattern ==== | |||
<div style="text-align:center;"> | |||
[[File:WildZombiePattern.gif|240px]] | |||
</div> | |||
{| class="wikitable" | |||
! Attack !! Damage !! Special Effect | |||
|- | |||
| Chase || 10 HP || Critical Damage deals 20 HP | |||
|} | |||
==== Execution ==== | |||
# Lure or locate 1 Wild Zombie at a time | |||
# Keep a 4-5 tile distance | |||
# Hit the Wild Zombie once and run away to maintain 4-5 tile distance | |||
# Wait for 2.5s-3s attack cooldown | |||
# Repeat the process | |||
'''Tip:''' Wild Zombie has a small hit box. Don't confront aggressively — wait for the right time to hit and run. | |||
=== Wild Dragon === | |||
[[File:Dragon.png|180px]] | |||
Wild Dragons are dangerous hostile creatures found in the [[Wilderness]] and [[Wilderness Extension]]. | |||
==== Mob Information ==== | |||
{| class="wikitable" | |||
! Name !! Wild Dragon | |||
|- | |||
| HP || 5 Bars | |||
|- | |||
| Aggro Range || 3 Tiles | |||
|- | |||
| Location || [[Wilderness]] | |||
|- | |||
| Spawn Time || 60 seconds | |||
|} | |||
==== Attack Pattern ==== | |||
<div style="text-align:center;"> | |||
[[File:WildDragonPattern.gif|240px]] | |||
</div> | |||
{| class="wikitable" | |||
! Attack !! Damage !! Special Effect | |||
|- | |||
| Chase || 10 HP || Critical Damage deals 20 HP | |||
|} | |||
==== Execution ==== | |||
# Lure or locate 1 Wild Dragon at a time | |||
# Keep a 4-5 tile distance | |||
# Hit the Wild Dragon once and run away to maintain 4-5 tile distance | |||
# Wait for 2.5s-3s attack cooldown | |||
# Repeat the process | |||
'''Tip:''' Wild Dragon has higher movement speed than the Wild Zombie — don't confront aggressively and wait for the chance to hit and run. | |||
=== Magma Brute === | |||
[[File:Magma_Brute.png|180px|link=Magma Brute]] | |||
Magma Brutes are large hostile mobs found in [[Emberstone]]. | |||
==== Mob Information ==== | |||
{| class="wikitable" | |||
! Name !! Magma Brute | |||
|- | |||
| HP || 7 Bars | |||
|- | |||
| Aggro Range || 8 Tiles | |||
|- | |||
| Location || [[Emberstone]] | |||
|- | |||
| Spawn Time || 30-40 seconds | |||
|} | |||
==== Attack Pattern ==== | |||
<div style="text-align:center;"> | |||
[[File:MagmaBrutePattern.gif|240px]] | |||
</div> | |||
{| class="wikitable" | |||
! Attack !! Damage !! Special Effect | |||
|- | |||
| Pounce || 30 HP || On a successful pounce, the character may get locked in position | |||
|} | |||
==== Execution ==== | |||
# Lure or locate a single Magma Brute | |||
# Let it pounce from 6-8 tiles away and dodge | |||
# Hit the Magma Brute | |||
# Keep 4-6 tile distance while attack is on cooldown | |||
# Wait for another pounce (close range = shorter pounce) and dodge | |||
# Hit the Magma Brute | |||
# Repeat | |||
'''Tip:''' Magma Brute pounce has 3-4seconds cooldown. You have 0.5-1.5 seconds to dodge the pounce. Use the surrounding rocks to your advantage. | |||
[[Category:Kintara Wiki]] | [[Category:Kintara Wiki]] | ||
Revision as of 05:47, 6 July 2026
Having a Combat Strategy gives advantages while dealing with Mobs and Bosses.
Boss Strategy
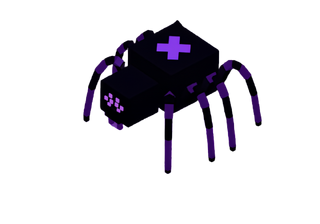
Boss Room

Inside the boss room there are 31 safe tiles where you can hide to avoid the boss attack.
Safe tiles are marked as "X".
Positioning
North and South
| South | North |
|---|---|
|
|
West and East
| West | East |
|---|---|
|
|
Mounts
North and South
 Dragon Mount |
 Wolf Mount |
 Spider Mount |
 Whale Mount |
 Gold Whale Mount |
 Crocodile Mount |
 Venomweaver Mount |
West and East
 Eagle Mount |
 Tiger Mount |
 Unicorn Mount |
 Harambe Mount |
 Octopus Mount |
 Tralalero Tralala Mount |
 Molten Phoenix Mount |
 Trex Mount |
 Snake Mount |
 Black Bull Mount |
Attack Pattern

Boss Attack Pattern
Venomweaver has 3 different attack patterns.
| Attack | Damage | Effect |
|---|---|---|
| Ground Stomp | At least 3 HP/Shield | Purple shock wave; chance of being pushed back to the edge of the boss room if hit in an open area |
| Web Attack | 3-4 HP/Shield | Combined with every 5th Ground Stomp; on hit, players can't move for at least 3 seconds |
| Spawning Little Spider | — | Boss randomly spawns a little spider that moves toward the nearest player (3-4 tiles from it) |
Player Attack Pattern
Knowing the Boss attack pattern and rhythm, players can successfully execute the Hit and Run attack pattern.
Execution:
- Take cover at the North, South, West, or East safe tiles
- Wait for the boss Ground Stomp and purple shock wave to pass the safe tile you're standing on
- Hit the Boss once and run back to the safe tile
- Repeat the process
Extra:
- Every 5th boss attack it will launch the Web Attack
- Run to the nearest tile without a "Web" icon
- Count up to 4 seconds and run back to your safe tile position
- On the next boss Ground Stomp, depending on your positioning, you can hit the boss 2-3 times before going back to your safe tile position
Tip: During the Web Attack, if you're near the boss you can hit it 1-2 times before running back to your safe tile position. Kill the spawned Small Spider as soon as possible. Player attack has a 2.5s-3s cooldown.
Mobs Strategy
Wild Zombie
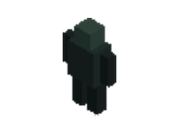
Wild Zombies are the most common hostile creatures in the Wilderness and Wilderness Extension.
Mob Information
| Name | Wild Zombie |
|---|---|
| HP | 5 Bars |
| Aggro Range | 3 Tiles |
| Location | Wilderness |
| Spawn Time | 60 seconds |
Attack Pattern

| Attack | Damage | Special Effect |
|---|---|---|
| Chase | 10 HP | Critical Damage deals 20 HP |
Execution
- Lure or locate 1 Wild Zombie at a time
- Keep a 4-5 tile distance
- Hit the Wild Zombie once and run away to maintain 4-5 tile distance
- Wait for 2.5s-3s attack cooldown
- Repeat the process
Tip: Wild Zombie has a small hit box. Don't confront aggressively — wait for the right time to hit and run.
Wild Dragon

Wild Dragons are dangerous hostile creatures found in the Wilderness and Wilderness Extension.
Mob Information
| Name | Wild Dragon |
|---|---|
| HP | 5 Bars |
| Aggro Range | 3 Tiles |
| Location | Wilderness |
| Spawn Time | 60 seconds |
Attack Pattern

| Attack | Damage | Special Effect |
|---|---|---|
| Chase | 10 HP | Critical Damage deals 20 HP |
Execution
- Lure or locate 1 Wild Dragon at a time
- Keep a 4-5 tile distance
- Hit the Wild Dragon once and run away to maintain 4-5 tile distance
- Wait for 2.5s-3s attack cooldown
- Repeat the process
Tip: Wild Dragon has higher movement speed than the Wild Zombie — don't confront aggressively and wait for the chance to hit and run.
Magma Brute
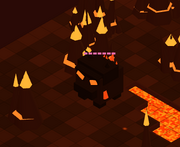
Magma Brutes are large hostile mobs found in Emberstone.
Mob Information
| Name | Magma Brute |
|---|---|
| HP | 7 Bars |
| Aggro Range | 8 Tiles |
| Location | Emberstone |
| Spawn Time | 30-40 seconds |
Attack Pattern

| Attack | Damage | Special Effect |
|---|---|---|
| Pounce | 30 HP | On a successful pounce, the character may get locked in position |
Execution
- Lure or locate a single Magma Brute
- Let it pounce from 6-8 tiles away and dodge
- Hit the Magma Brute
- Keep 4-6 tile distance while attack is on cooldown
- Wait for another pounce (close range = shorter pounce) and dodge
- Hit the Magma Brute
- Repeat
Tip: Magma Brute pounce has 3-4seconds cooldown. You have 0.5-1.5 seconds to dodge the pounce. Use the surrounding rocks to your advantage.
This category currently contains no pages or media.